T1 and PSTN Access Labs
Physical Wiring
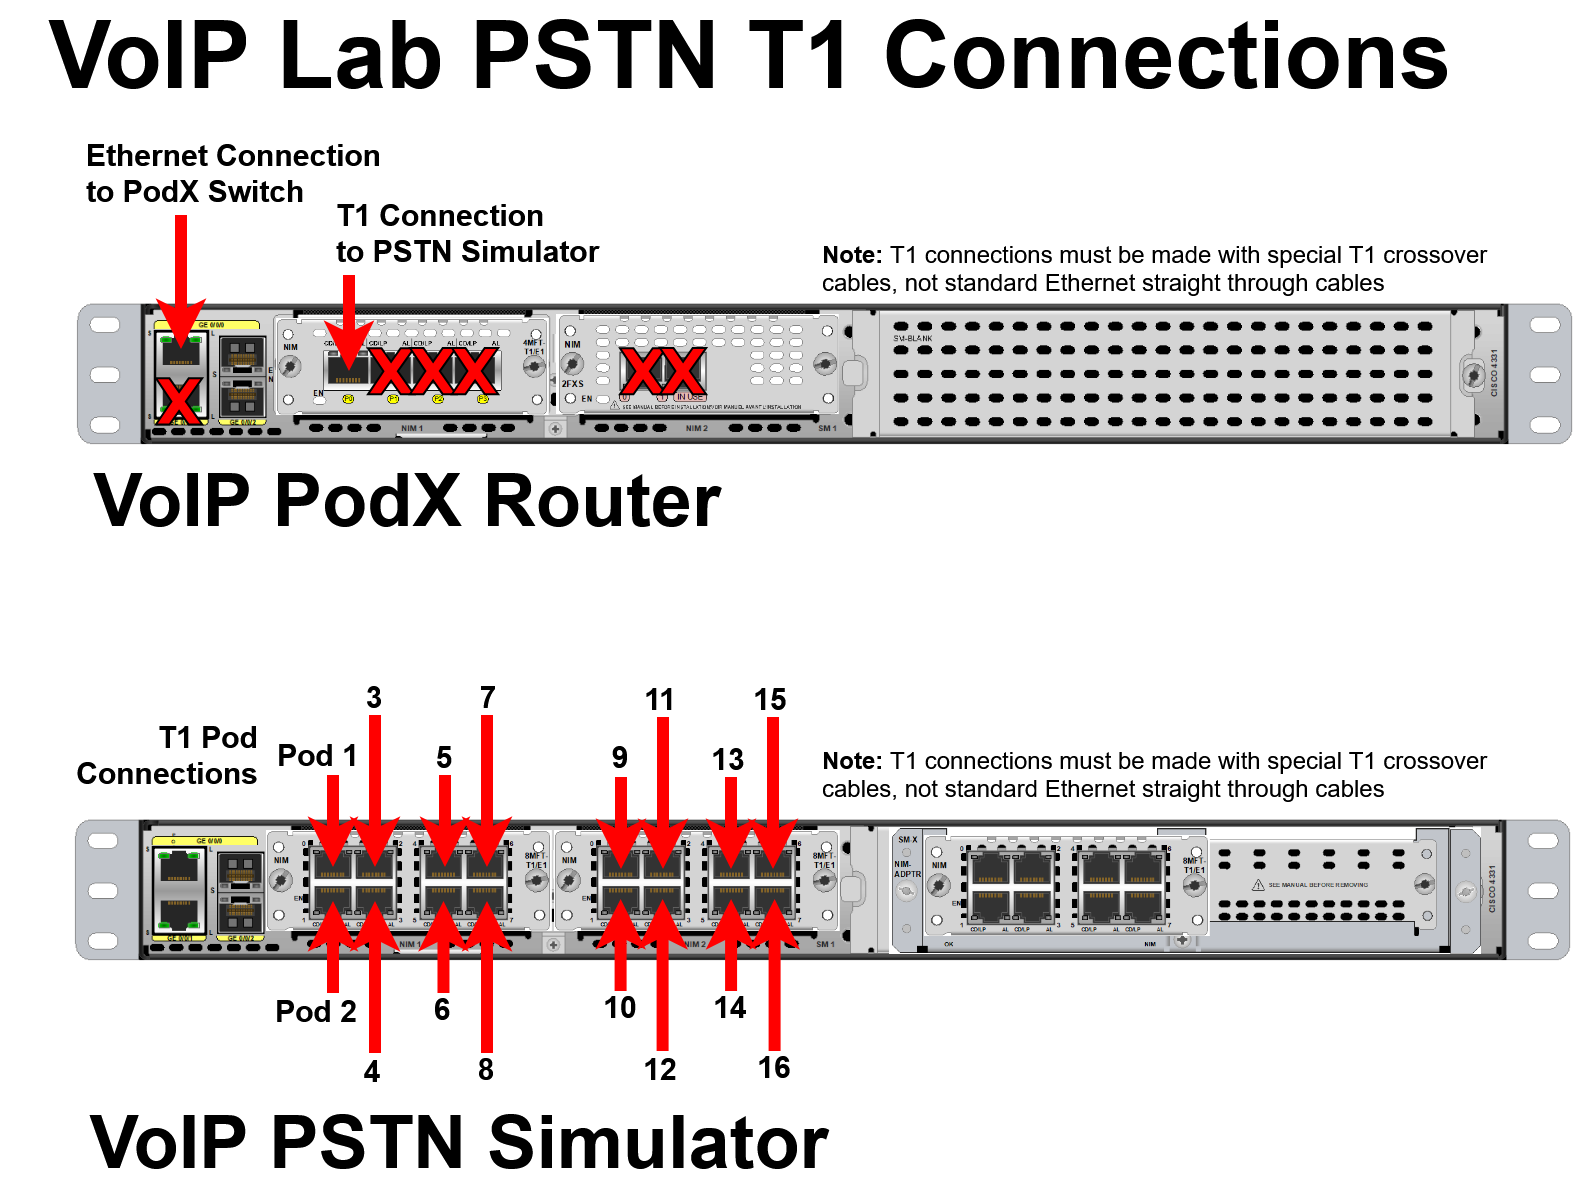
For the T1 portion of this lab you will need to physically connect the router serving as a T1 gateway for your pod to the "phone company" which is the T1 PSTN Simulator. There is a specific port on the T1 PSTN Simulator which has the correct phone numbers assigned to it for your pod (this would be the set of T1 wires coming into your business) so it is important you connect to the correct port. See the diagram below which indicates which port on your T1 gateway router should be connected to the T1 PSTN Simulator.
IP Addressing & Phone Numbers
These are the IP addresses and phone extension numbers assigned to your pod which you can use for your pod.
| Pod | Phone Extension Range | VoIP Classroom Switch Uplink Port | T1 PSTN Numbers Assigned | ITSP PSTN Numbers Assigned |
|---|---|---|---|---|
Pod 1 |
0100-0199 |
Gi1/0/1 |
5105550100-5105550199 |
5104440100-5104440199 |
Pod 2 |
0200-0299 |
Gi1/0/2 |
5105550200-5105550299 |
5104440200-5104440299 |
Pod 3 |
0300-0399 |
Gi1/0/3 |
5105550300-5105550399 |
5104440300-5104440399 |
Pod 4 |
0400-0499 |
Gi1/0/4 |
5105550400-5105550499 |
5104440400-5104440499 |
Pod 5 |
0500-0599 |
Gi1/0/5 |
5105550500-5105550599 |
5104440500-5104440599 |
Pod 6 |
0600-0699 |
Gi1/0/6 |
5105550600-5105550699 |
5104440600-5104440699 |
Pod 7 |
0700-0799 |
Gi1/0/7 |
5105550700-5105550799 |
5104440700-5104440799 |
Pod 8 |
0800-0899 |
Gi1/0/8 |
5105550800-5105550899 |
5104440800-5104440899 |
Pod 9 |
0900-0999 |
Gi1/0/9 |
5105550900-5105550999 |
5104440900-5104440999 |
Pod 10 |
1000-1099 |
Gi1/0/10 |
5105551000-5105551099 |
5104441000-5104441099 |
Asterisk Server ens192 Interface:
| The ens192 interface on your Asterisk server is used to connect to the network. |
-
Static IP Address: 192.168.1.10/24
-
Default Gateway: 192.168.1.1
-
DNS Server: 192.168.1.1
Pod T1 Gatewway Router:
-
G0/0/0 IP Address: 192.168.1.5/24
-
Default Gateway: 192.168.1.1
| The XX99 extension will be used for future voicemail capability so that one should not be used for a regular phone/line. |
Work you can do remotely
In genreal you will be able to change all the configuration files and do all the software installation work remotely if you want. You will need to come to campus and setup the network with the router, switch, and phones in order to test anything, get the correct MAC addresses to put in the configurations, etc.
-
You will be able to modify your extensions.conf and pjsip.conf files for T1 PSTN access.
-
You will be able to modify your pjsip.conf file for SIP PSTN access, you will not be able to modify the extensions.conf file for that yet as it can only be configured for either T1 or SIP access to the PSTN at one time and not both.
Internal Network Setup
When you are on campus and working with your IP phones you will need to setup your internal network with your pod router and switch as you did for the previous lab.
-
Use the sample switch and router configurations (need to be modified with correct IP addressing for your pod) to configure the router as a NAT device and DHCP server for your pod LAN.
-
Connect port Fa0/0 on your pod router to an available port on the B144 ITCnet classroom switch.
-
Connect for Fa0/1 on your pod router to port Gi1/0/24 on your pod switch.
-
Connect for port Gi1/0/23 on your pod switch to the correct port on the classroom switch identified in the table at the top of the lab. This connection will make a layer 2 connection from your Asterisk server’s ens224 interface to your internal pod network (the 192.168.10.0/24 subnet).
-
Sign in to a second PC in the classroom. After you have successfully signed in connect that PC to port Gi1/0/1 on your pod switch.
-
Because of our NAT and DHCP setup on the router even after connecting to the pod LAN the second PC should still have working Internet access. It should also be able to now ping both the inside and outside IP addresses of your pod’s Asterisk server and access the server using PuTTY (SSH) and Filezilla (SCP).
Of course, make sure that your Asterisk server is up and running! It’s strongly suggested you connect to and work on your Asterisk server over SSH from this point on instead of trying to use the Netlab console. Cut and paste support works in PuTTY which it does not in the Netlab console and can transfer files in and out of your server using Filezilla. -
Setup at least four IP phones (any mix of Cisco, generic SIP, or DPMA) and ensure they are working (can call each other and can call the extension 1000 demo).
T1 PSTN Access
In this activity we will configure your Asterisk server to contact the Public Switched Telephone Network (PSTN) using a dedicated T1 PRI voice trunk to a telephone company. This would normally be a service which you would pay for incoming and outgoing (termination and origination) connections to the PSTN and which you would access over a dedicated digital T1 voice trunk. In our case you will connect to a simulated PSTN connection which will be able to call several test numbers and other pods but is not actually connected to the real PSTN.
-
Get an ISDN PRI T1 connection from the "phone company" (your instructor) to your router. This will require connecting a T1 crossover cable to the correct port on the PSTN ISDN Switch Simulator.
Just like with a regular phone line coming in the wall you need to plug your Pod into the correct port on the PSTN ISDN Switch Simulator. This is not an IP network where you can plug in wherever you’d like. Pod A goes into the farthest upper left port on the PSTN T1 Switch Simulator and pod letters increase as you go to down and to the right. Also, be sure to use a special T1 crossover cable for this connection. -
Update your router configuration to allow it to serve as an ISDN<→SIP gateway device which will convert ISDN T1 calls to and from SIP VoIP calls which can be routed by Asterisk.
-
Update your pjsip.conf file to add the router as a SIP endpoint which can be used to place calls out to the PSTN or receive calls from the PSTN.
We specify the IP address for the router for incoming and outgoing calls instead of having the router register with a username and password to the PJSIP module. This is somewhat common when using T1-SIP gateways and is the only way Cisco routers support being a gateway which is why we are using it. -
Modify your extensions.conf file to allow internal extensions to place calls out to the PSTN through the ISDNrouter SIP device (which will convert the calls to a T1 PRI trunk call) if the number begins with a 9 for an outside line.
You will want to think about all the different types of numbers someone could call and create dialplan rules in Asterisk to handle all of them. For some of these you will need to use pattern matching, for others like 911, you probably want to match the exact number for dialing timeout speed reasons. Most states now require phone systems to allow people to dial 911 directly, without needing to dial 9-911 for an outside line. You should program your system to call 911 on the PSTN for BOTH 911 and 9-911. -
Try placing calls out to the PSTN and make sure things are all working
-
Test at least the following types of calls:
-
Local calls (both by dialing 7-digit numbers and 10-digit numbers)
-
Long distance calls (calls to a different area code than the 510 area code, and which begin with a 1)
-
Toll-free numbers (1-800, 1-888, etc.)
-
Per-minute premium charge numbers (1-900)
-
Emergency Services (911, 9-911)
-
Directory Assistance (411)
-
International Numbers (Numbers beginning with 011)
-
-
-
While you are placing test calls monitor the output from your router’s console port, you should see the calls being placed over the T1 connection. You should also try placing calls and while the call is active running the show voice call status command on the router. Finally try turning on ISDN Q.931 debugging with the debug isdn q931 command before placing a test call. You should see the router dialing the phone number on the ISDN T1 connection to the PSTN as the call is being setup. Run undebug all on your router to disable the debugging.
-
It’s important to think about toll fraud and you should setup your dialplan (at least after initial testing) to restrict callers from places like elevators calling certain numbers. In Asterisk you can do this using a variety of different dialplan contexts. Follow the sample extensions.conf file instructions for dividing up your extensions into elevator/lobby/general staff/executive restrictions on calls. Put one of your extensions in each of these different contexts and verify the restrictions are working.
-
Modify your sample extensions.conf file to allow calls FROM the PSTN to your internal phones (each extension has a phone number like 510555XXXX where XXXX is the extension number when calls come in over the T1 PSTN connection).
-
Find another pod who has calling out to the PSTN working and try placing calls from each pod to the other pod to verify incoming PSTN calls are working. You can also try calling the the test number at 510-555-0000 and hanging up as soon as the call is answered and you should get a call back from the phone company test system.
ITSP SIP PSTN Access
In this activity we will configure your Asterisk server to contact the Public Switched Telephone Network (PSTN) using a SIP trunk to an Internet Telephony Service Provider (ITSP). This would normally be a service which you would pay for incoming and outgoing (termination and origination) connections to the PSTN and which you would access over your regular Internet connection. In our case you will connect to a simulated PSTN connection which will be able to call several test numbers and other pods but is not actually connected to the real PSTN.
-
Disconnect the ISDN PRI T1 connection from the "phone company" (your instructor) to your router.
-
Update your pjsip.conf file to add the required registration, endpoint, aors, auth, and identity sections required to connect to your ITSP.
-
Make sure you have up to date external media and signaling addresses in your PJSIP configuration file.
-
Add appropriate firewall and NAT forwarding rules to your OpnSense router to forward ports 5060 (TCP and UDP) and 10000-20000 (UDP) to the IP address of your Asterisk server.
-
Modify your extensions.conf file to allow internal extensions to place calls out to the PSTN through the sipPSTN SIP device (which is the connection to your ITSP) if the number begins with a 9 for an outside line. If you had a working T1 SIP gateway PSTN configuration this will just involve changing which endpoint those calls are being directed to.
You will want to think about all the different types of numbers someone could call and create dialplan rules in Asterisk to handle all of them. For some of these you will need to use pattern matching, for others like 911, you probably want to match the exact number for dialing timeout speed reasons. Most states now require phone systems to allow people to dial 911 directly, without needing to dial 9-911 for an outside line. You should program your system to call 911 on the PSTN for BOTH 911 and 9-911. -
Try placing calls out to the PSTN and make sure things are all working and that they are going through the ITSP and NOT the T1 connection.
-
Test at least the following types of calls:
-
Local calls (both by dialing 7-digit numbers and 10-digit numbers)
-
Long distance calls (calls to a different area code than the 510 area code, and which begin with a 1)
-
Toll-free numbers (1-800, 1-888, etc.)
-
Per-minute premium charge numbers (1-900)
-
Emergency Services (911, 9-911)
-
Directory Assistance (411)
-
International Numbers (Numbers beginning with 011)
-
-
-
Verify all your toll-fraud preventions you had in place for calling out from various types of extensions to the PSTN for the T1 gateway are still working.
-
Verify your extensions.conf file is still setup to allow calls FROM the PSTN to your internal phones (each extension has a phone number like 510444XXXX where XXXX is the extension number when calls come through the SIP PSTN provider). Note that the phone number for calls coming in over SIP starts with 510-444-XXXX which is a different prefix then when calls came in over the T1. This will require adding these new incoming numbers to your dialplan so that Asterisk can route the calls appropriately.
-
Find another pod who has calling out to the PSTN working and try placing calls from each pod to the other pod to verify incoming PSTN calls are working. You can also try calling the the test number at 510-555-0000 and hanging up as soon as the call is answered and you should get a call back from the phone company test system.
Cleanup
-
Safely shutdown your Debian system
-
Erase your switch/router configuration
-
Put away all equipment and cables. Be sure to note which phones you have so that next week you’ll be able to get the same five phones.
Document Build Time: 2026-04-28 17:35:43 UTC
Page Version: 2026.01

This work is licensed under a Creative Commons Attribution-ShareAlike 4.0 International License