Introduction to VoIP with Asterisk Labs
IP Addressing & Phone Extensions
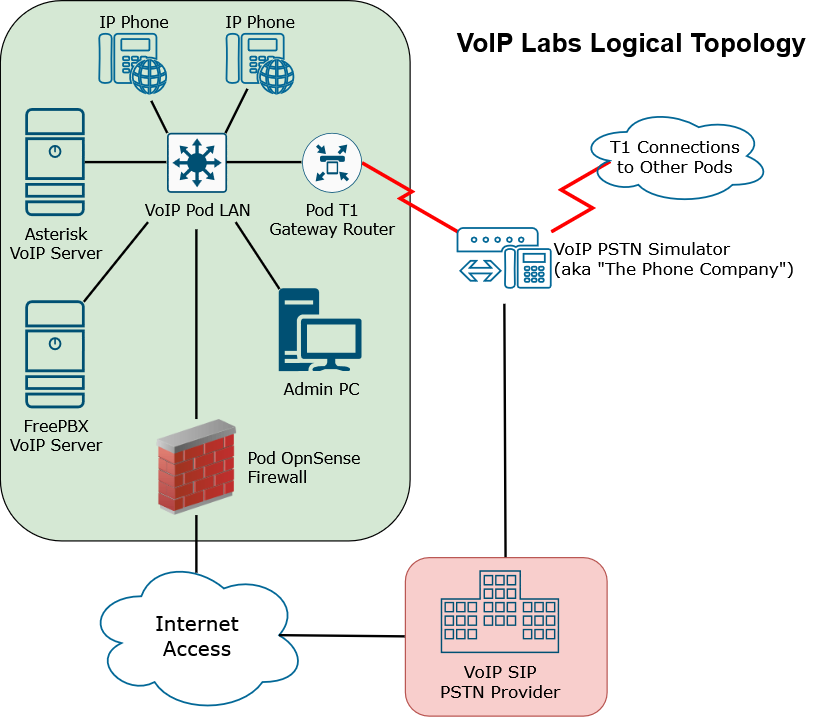
These are the IP addresses and phone extension numbers assigned to your pod which you can use for your pod.
| Pod | Phone Extension Range | VoIP Classroom Switch Uplink Port |
|---|---|---|
Pod A |
0100-0199 |
Gi1/0/1 |
Pod B |
0200-0299 |
Gi1/0/2 |
Pod C |
0300-0399 |
Gi1/0/3 |
Pod D |
0400-0499 |
Gi1/0/4 |
Pod E |
0500-0599 |
Gi1/0/5 |
Pod F |
0600-0699 |
Gi1/0/6 |
Pod G |
0700-0799 |
Gi1/0/7 |
Pod H |
0800-0899 |
Gi1/0/8 |
Pod I |
0900-0999 |
Gi1/0/9 |
Pod J |
1000-1099 |
Gi1/0/10 |
Asterisk Server Network Interface:
| The ens192 interface on your Asterisk server is used to connect to the network. It is a DHCP address by default but you will want to set it to a static address. |
-
Static IP Address: 192.168.1.10/24
-
Default Gateway: 192.168.1.1
-
DNS Server: 192.168.1.1
Pod T1 Gateway Router:
| We will not be configuring the router yet, this is just here so that you have a record of it’s eventual IP addressing. |
-
G0/0/0 IP Address: 192.168.1.5/24
-
Default Gateway: 192.168.1.1
| The XX99 extension will be used for future voicemail capability so that one should not be used for a regular phone/line. |
Work you can do remotely
Important information to read
When putting a VoIP server behind your firewall you will need to eventually open some ports to it for SIP and RTP audio in order to exchange calls with the VoIP provider but on the Internet there are a lot of attempts at VoIP fraud by hackers looking to take advantage of SIP ports open to the Internet so if you were actually put a SIP server on ther Internet you would need to use appropriate security features to blacklist IPs which are making failed connection attempts (attempted brute forcing SIP credentials) along with other precautions within your dialplan to prevent hopping through your PBX (and either impersonating your company or racking up charges).
Access your VoIP Pod via Netlab and Verify Functionality
-
Verify which pod letter you have and connect to the pod via Netlab
-
Ensure both Debian and Asterisk have been installed to your Asterisk server
-
Configure a static IP address, gateway, and nameserver on the Debian server
-
Ensure you have working access out to the Internet.
Basic Asterisk configuration
In this section of the lab you will manually provision two generic SIP phones and set them up for internal calling through Asterisk. You will use on Digium A25 phone and one Grandstream GXP2160 as the phones.
We will manually configure the SIP phones with settings through the web user interface instead of using TFTP configuration methods. Most generic SIP phones can be configured this way through a web interface though it is typically only feasible for very small VoIP installations as it is simple to do but slow.
-
Edit your
pjsip.conffile as required to create a new transport, line, authentication, and AoR section to use on the phones at extension xx01 and xx02. See the sample pjsip.conf file for some hints. -
Modify your extensions.conf file to add the two phone extensions to the default context and allow calling between phones
Work you need to do on campus
Physical Wiring
-
Connect for port Gi1/0/24 on your pod switch to the correct port on the classroom switch identified in the table at the top of the lab. This connection will make a layer 2 connection from your virtual VoIP Pod LAN on Netlab to your physical network switch.
-
Sign in to a PC in the classroom. After you have successfully signed in connect that PC to port Gi1/0/1 on your pod switch. The PC should now be on your VoIP Pod LAN and be able to ping your Asterisk server and access your OPNSense Pod Router.
Of course, make sure you have an active reservation in Netlab and that your Asterisk server is up and running! It’s strongly suggested you connect to and work on your Asterisk server over SSH from this point on instead of trying to use the Netlab console. Cut and paste support works in PuTTY which it does not in the Netlab console and can transfer files in and out of your server using Filezilla. You can use either your classroom PC (once connected to your VoIP Pod LAN or the Admin PC in Netlab which is always on that network). -
Connect both of the VoIP phones to your VoIP Pod Switch as well and ensure they have IP addresses from your router.
Phone confgiuration
-
Since we will be manually provisioning the phone using the web interface open a web browser on a PC attached to your VoIP Pod LAN network (either your classroom PC or the Admin PC in Netlab) and browse to the IP address of the Digium A25 phone. Login with the username admin and password 789
-
On the phone admin line settings webpage configure SIP Line 1 with the required user name, display name, authentication name, authentication password, SIP Proxy server address (the IP of your Asterisk server), and check the box to activate the line.
-
Connect to the Asterisk CLI and issue the
reloadcommand. -
Ensure the phone is registering correctly to Asterisk
-
Verify you can successfully place a call to extension 1000 from the phones. This is a pre-built demo extension.
-
Configure the Grandstream GXP 2160 phone in a similar way for the other extension number you set up in your PJSIP configuration file.
-
Test calling between phones
-
Safely shutdown your Debian system, erase your switch/router configuration, and put away all equipment and cables including to re-connect your classroom PC to the "B" campus network connection.
Document Build Time: 2026-09-21 17:02:57 UTC
Page Version: 2026.08

This work is licensed under a Creative Commons Attribution-ShareAlike 4.0 International License